sentinel-kit
🛡️ Sentinel Kit Documentation
Welcome to Sentinel Kit, the unified security platform that simplifies SOC and DFIR operations through automated deployment and streamlined management.
🚀 Getting Started
New to Sentinel Kit? Start here:
- Getting Started Guide
- Understanding
.envcentral configuration file - Initial platform deployment using the launcher
- Creating your first admin user
- Accessing the platform components
- Understanding
- Data Ingestion Setup
- Configure log sources and collection agents
- Advanced datasource configuration for various data types
- Monitor data ingestion health and performance
- Sigma Rules Management
- Create custom detection rules using Sigma format
- Import community detection rules
- Rule testing and validation workflows
- Alert Management & Investigation
- Alert triage and investigation procedures
- Using the integrated dashboard vs Kibana
- Response actions and case management
- Monitoring & Health
- Platform health monitoring with Grafana
- Service status checking and troubleshooting
- Performance optimization guidelines
📋 Quick Reference
Platform Access Points
- Main Dashboard:
https://sentinel-kit.local - Kibana:
https://kibana.sentinel-kit.local - Grafana:
https://grafana.sentinel-kit.local
Launcher Commands
./launcher.ps1 start    # Start all services
./launcher.ps1 stop     # Stop all services
./launcher.ps1 status   # Check service health
./launcher.ps1 logs     # View real-time logs
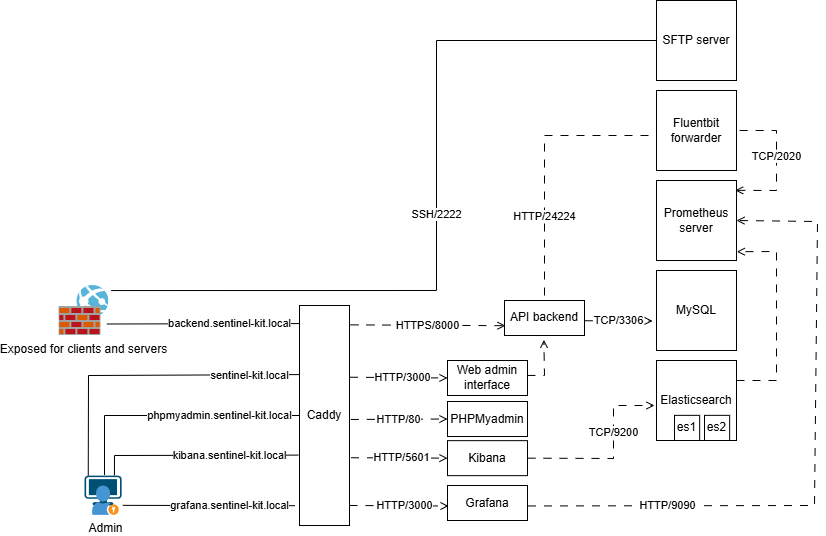
🎯 Platform Overview
Sentinel Kit integrates multiple security tools into a unified platform:
Core Components
- Detection Engine: Sigma-based rule processing with Elastalert
- Log Management: FluentBit collection + Elasticsearch storage
- User Interface: Vue.js dashboard with integrated analysis tools
- Monitoring: Prometheus metrics + Grafana visualization
Key Features
- One-Command Deployment: Complete platform setup with launcher scripts
- Unified Dashboard: Centralized security operations interface
- Real-Time Detection: Continuous log analysis with custom rules
- Integrated Tools: Native alert management + Kibana/Grafana integration
- Scalable Architecture: Microservices design for growth and customization
🆘 Support & Community
- Documentation Issues: Report via GitHub Issues with
documentationlabel - Platform Bugs: Use GitHub Issues with appropriate labels
- Feature Requests: Discuss in GitHub Discussions
- Security Issues: Report privately to maintainers